Query Criteria
Query Criteria is a
set of filters that determine which rows
of data will be returned as part of your query. The
Criteria Builder defines those filters to
ensure that you only get the rows
of data that you desire.
There are two different pieces
needed to establish criteria:
Conditions
 Conditions are single-filter expressions that determine
what rows to include or exclude from the query result. Each line in the
query criteria is referred to as a condition. The
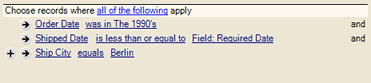
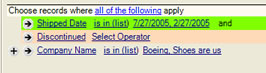
graphic shown here depicts three conditions that have been applied in
the Criteria Builder for the fields Order
Date, Shipped Date and
Ship City.
Conditions are single-filter expressions that determine
what rows to include or exclude from the query result. Each line in the
query criteria is referred to as a condition. The
graphic shown here depicts three conditions that have been applied in
the Criteria Builder for the fields Order
Date, Shipped Date and
Ship City.
Click on the  icon to add a condition to the Criteria Builder.
A new condition
line will appear with links instructing you to select a Field (loosely
defined, a field is a single element of data, most commonly a column)
and select an Operator.
icon to add a condition to the Criteria Builder.
A new condition
line will appear with links instructing you to select a Field (loosely
defined, a field is a single element of data, most commonly a column)
and select an Operator.
See below for setting grouping rules.
Field Selection
 The first item that must be selected for a condition line
is the Field to be filtered. To select the field, click on the Select
Field link and a list of available fields will be displayed. Choose
the field that to use as a filter for your query.
The first item that must be selected for a condition line
is the Field to be filtered. To select the field, click on the Select
Field link and a list of available fields will be displayed. Choose
the field that to use as a filter for your query.
Operators
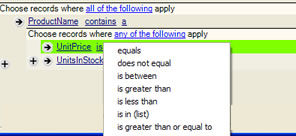 The available operators for each condition depend upon
which field has been chosen for the filter. When
clicking on the operator link (see graphic above), all of the available
operators for the selected field are displayed in a list. For example,
dates will only give prompts that apply to dates, and, true/false fields
will only show 'true' or 'false' in the drop down menu.
The available operators for each condition depend upon
which field has been chosen for the filter. When
clicking on the operator link (see graphic above), all of the available
operators for the selected field are displayed in a list. For example,
dates will only give prompts that apply to dates, and, true/false fields
will only show 'true' or 'false' in the drop down menu.
Also displayed (if available) is a menu item called Choose
Special Value. This option provides a special combination of an
operator and a value to complete the condition line. It should be noted
that some fields have special value options and others do not.
Values
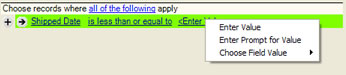 Values for each condition may also be selected using the
drop-down menu. There are up to four different types of response available
in response to clicking the value link.
Values for each condition may also be selected using the
drop-down menu. There are up to four different types of response available
in response to clicking the value link.
Enter Value - On choosing this option, an edit box
appears in place of the link in which to enter or select a value for the
condition. The type of edit box that appears is dependent on the
field and operator already chosen on the condition line. Some edit boxes
allow the entry of a single value using the keyboard, some provide a list
of possible options, and some allow the entry of a list of values.
Enter Prompt for Value
-When creating a query where
the value of a filter condition can change every time the query is run,
it is possible to prompt the person running the query for the correct
value. For
this option, choose the Enter
Prompt for Value. This option
brings up a dialogue box requesting the appropriate prompt text
be supplied for the condition. For example, if the prompt was to request
the period for a report,the following text might be entered: "Select the period applicable for this report".
When someone
then later runs the query, they will be prompted to provide the value(s)
that have been established by the query report.
Note: For operators that require 2 or more values (for example Is Between)
the enter prompt value will apply for all the values (any other values
will disappear and be replaced with the prompt). You can not specify a
value for one and prompt for the other value on the same condition, to
do that you would need to use multiple conditions, in the case of is between,
you would have to create a greater than and less than condition and assign
the value/prompt for value appropriately.
Choose Field Value - This option provides the ability
to filter based on the relationship between two fields in the rows
returned. An example might be a query to return all orders where the date
delivered was on or before the date required. The field value for this
query would read: delivery
date is less than or equal to
required
date.
Choose Special
Value - This option provides a special combination of operator
and value to complete the condition line. Some fields have special value
options and others do not. Choose special values from either the operator
or the values link menus.
Grouping
Each line in the query criteria is referred to as a condition. Additional
lines may be created to allow multiple conditions per query. When using
more than one condition in a query, it is necessary to determine how these
conditions work together for the desired query result. Setting The grouping
rule determines the group type. For example, data may be filtered based
upon either of two conditions being true (an 'or' group), or on both conditions
being true (an 'and' group).
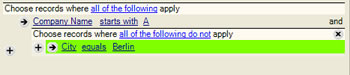
Grouping Rules
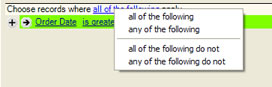
The terms in the drop-down box above allow criteria grouping in the
following ways:
All of the following - the query will only
return data which meets all of the criteria
selected
Any of the following - the query will return data
which meets at least one of the criteria
selected
All of the following do not - the query will only exclude data which meets all
of the criteria selected
Any of the following do not - the query will exclude
data which meets any of the criteria selected
Creating Conditions
Click on the to begin creating query conditions. Click
on Select Field and
Select Operator to set the conditions for that line.
NOTE: An incorrect condition within the
query will be highlighted in pink. To rectify the incorrect condition,
click on the field and/or operator/
A Condition may be removed by clicking the  on the row
to be removed.
on the row
to be removed.
Creating Groups
 When creating groups, it is necessary to determine what
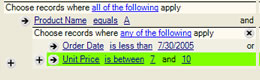
should be returned by the query. This example shows a query structure
to return only those products beginning with the letter 'a', with an order
date before July, 30, 2005 OR with a unit price between $7.00 & $10.00
. Therefore the query statement used 'all of the
following' to return the products beginning with 'a';
and further refined by grouping the
date and price under any of the following.
When creating groups, it is necessary to determine what
should be returned by the query. This example shows a query structure
to return only those products beginning with the letter 'a', with an order
date before July, 30, 2005 OR with a unit price between $7.00 & $10.00
. Therefore the query statement used 'all of the
following' to return the products beginning with 'a';
and further refined by grouping the
date and price under any of the following.
Creating a New Group
 First, create the line by clicking , select
the field and operator.
First, create the line by clicking , select
the field and operator.
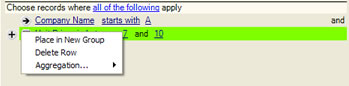
Click the to
activate the drop-down box; select Place in New
Group.
Select the appropriate grouping rule.
Additional conditions may be created by clicking the .
Click the  to delete the grouping and all criteria lines
associated with a grouping.
to delete the grouping and all criteria lines
associated with a grouping.
Aggregation
 Aggregation applies mathematical operations to columns
in the query criteria. It
provides the ability to perform mathematical operations on a column in
the query result and to further filter that result. For example, to return
a list of products where more than ten were sold in a month, the aggregation
expression would look like this: "Sum
(quantity sold) is greater than 10"
Aggregation applies mathematical operations to columns
in the query criteria. It
provides the ability to perform mathematical operations on a column in
the query result and to further filter that result. For example, to return
a list of products where more than ten were sold in a month, the aggregation
expression would look like this: "Sum
(quantity sold) is greater than 10"
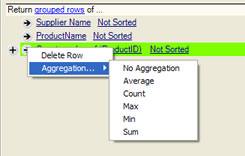
Click on the icon and select Aggregation
from the drop-down box. Depending on the type of column that you
have selected (i.e.: numeric or non-numeric), there will be different
aggregation options available for that column. The
following list includes all of the aggregation options available for all
column types:
Average - Provides
the average of all numbers in the selected column in the return set. For
example, this aggregation might be useful to report the average GPA for
a graduating class.
Count - Provides
a count of the number of rows in the return set that have a value in the
selected column. For example, this aggregation could be used to count
the number of students in a class.
Max - Returns the
highest number for the selected column in any row in the return set. For
example, this aggregation could be used to report on the highest GPA score
in the class.
Min - Similar to
Max above, Min returns the lowest number for the selected column in the
return set.
Sum - Adds together
all values in the return set for the selected column. For example, this
aggregation could be used to add together the 'Quantity'
value in a list of orders to find out how many items were ordered..
No Aggregation -
resets an aggregated field to no aggregation.