Managing Contributions
Table of Contents
- Overview
- Process Objectives
- The Process
- Using The Gnosis System
- Contributions Batch Management Form
- Entering Contributions
- Printing Batch Summary Report
- Acknowledging Contributions
1. Overview
Gnosis is designed to work in tandem with your
accounting software to manage contributions recording. Accounting systems are
designed to manage finances. Gnosis is designed to manage all person related
data – including contributions.
By using both systems together, you are maximizing your
ability to use contributor information while keeping accurate financial
records.
Return to Top
2. Process Objectives
Gnosis is your primary accurate source for stakeholder
information. It is the central repository for addresses, phone
numbers, and a range of other personal information. Changes to
contact and other related information will be made directly on
Gnosis, whether by
a database user or directly by the stakeholder herself via your web site.
Accounting information on the other hand is subject to a
different set of controls. There will be a small number of persons with update
access to your accounting records in order to ensure transactional integrity. In
order to use both systems together effectively, there needs to be an effective
process in place for the interchange of information between systems.
The objectives of this process then are as follows:
- Ensure that Gnosis continues to have up to date
person and organization contact information and an accurate record of
contributions for each person.
- Ensure that the accounting system has accurate financial
information for aggregated financial management reporting.
- Ensure that there is an auditable interface reconciling
the individual contributions in Gnosis to the aggregate reporting in the
accounting system.
Return to Top
3. The Process
 The recommended process for meeting the abovementioned
objectives is to record incoming contributions directly into the
Gnosis system and
utilize the contribution batch management process described here for the
recording of contribution totals to the accounting system. The recommended process for meeting the abovementioned
objectives is to record incoming contributions directly into the
Gnosis system and
utilize the contribution batch management process described here for the
recording of contribution totals to the accounting system.
Specifically, use the following process steps when
processing a batch of contributions (Note: a “batch” refers to a group of
Gnosis
contributions that together represent a single transaction posted to your
accounting system):
- From the “Contributions Batch Management” form in
Gnosis Pro, ensure that a new batch is selected as “Active” and that the defaults
for the batch are correctly set (i.e.: The account should be set correctly if
you receive into multiple accounts, and optionally, Campaign and Source should
be set if you track contribution campaign and source information).
- If you are receiving only one or two contributions, you may also use the
windows client to receive them by searching for each contributor and adding the
contribution. Alternatively, you may use
the "Contribution Batch Entry" process (generally available on
your Home Navigator). This interface allows you to entry
contributions from a multitude of donors and sources and also
supports the scanning of checks for fast check processing.
Lastly, you may also use the web client to
enter contributions there..
- When you are finished receiving contributions for the batch, in
Gnosis Pro, print a batch report that lists all of the entered
contributions.
- If the entered contributions are correct, “Close” the batch from the
“Contributions Batch Management” form in Gnosis.
- In your accounting system, enter a single transaction for
the total of contributions on the “Contributions Batch Report” (or a single
entry for each type of contribution totaled on the report --
i.e.: one entry for each of Checks and Cash) and file the report as the
reference source for the transaction(s) you have entered into your accounting
system.
Return to Top
4. Using The Gnosis System
Contributions Batch Management Form
The contributions batch management form in Gnosis Pro is used to manage batches and set the status of individual batches. To
enter the form, select the “Contribution Batch Mgmt” icon on the main navigator
form.
Once in the form, you are presented with the following:
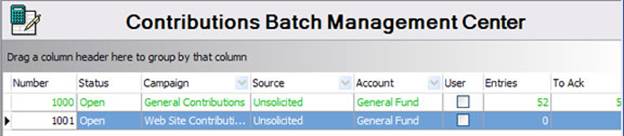
- Batch Number: Automatically assigned by the Gnosis
system and used to keep track of sequential batches of contributions.
- Status: A batch is “open” until such time as you
close it using this management screen. Once closed, no more transactions
can be posted to the batch and no existing transactions in the batch can
be altered in any way.
- Campaign: The optional campaign field allows you to
assign a batch of transactions to a specific special giving campaign. You
may have any number of batches concurrently open so that you may use
different batches to accumulate contributions organized by specific
campaigns. You may also set the campaign individually for each
contribution if you wish to receipt different campaign’s as part of a
single entry to your accounting system.
- Source: If you track the source of contributions,
you may set a default source for a specific batch here. The source of
each specific contribution may also be set, so, this is simply a default
setting for the batch.
- Account: The account setting allows you to reflect
multiple accounts that may be defined in your accounting system for the
purposes of receiving contributions. This allows you to have your
Gnosis
records accurately tie into your accounting records via-a-vis the account
to which a contribution was posted.
- User: If you check on the “User” check box, the
batch will only be available to you for entry of new contributions and it
will not appear to any other users in the list of available batches for
recording contributions.
- Entries: This column shows the number of
contributions that have been recorded for the selected batch.
- To Ack: This number displays the number of
contributions that have not been acknowledged to the contributor.
Entering Contributions
Contributions can be easily entered via the
Gnosis Pro Contribution Batch Entry function or if you will be using
the web client, via the Gnosis Back Office
interface.
Web Client (Gnosis Back Office):
On the side menu, select “Enter Contribution” to obtain the
contribution entry page and click on either “Individual” or “Organization” to
nominate the contributor.
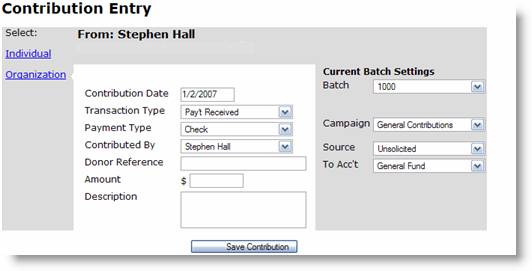
Here you will also select the batch to be used to receipt
the contributions, override any batch settings for a specific contribution and
respond to a customized set of contribution fields depending on the source of
the contribution.
Contribution Batch Entry
in Gnosis Pro
 On
the Home Navigator menu in Gnosis Pro, you will find the
Contribution Batch Entry function. This function allows you to
receipt multiple contributions into the system and optionally
provides you with the capability to use a MagTek USB Check Reader to
scan in contribution checks. On
the Home Navigator menu in Gnosis Pro, you will find the
Contribution Batch Entry function. This function allows you to
receipt multiple contributions into the system and optionally
provides you with the capability to use a MagTek USB Check Reader to
scan in contribution checks.
To enable check scanning, you will have to
install a MagTek USB check reader on the PC which you wish to use
and tell Gnosis Pro, which port to use to communicate with it. (Note:
To setup the correct port number for first time use of the reader,
hold down the control key while clicking on the "Contribution Batch
Entry icon" and you will be prompted to enter the USB check reader's
port number.).
To enable reading of checks by using the check
reader, check on the "Enable Check Scanning Mode" checkbox. The
first time a particular contributor's check is scanner, the system
will ask you to associate the check with a new or existing person
record in Gnosis. Once you have done this, future scans of
checks from that account will automatically associate with that
contributor, simplifying the contribution entry process.
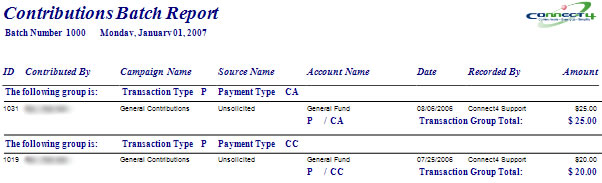
Printing Batch Summary Report
To print the batch summary report, go to the batch management
form, choose the required batch and run the report.
The report will print with sub-totals for each transaction
type ready for entry to the accounting system. Transaction types are: P =
Payment Received, R = Payment Returned/Refunded, A = Adjustment of previous
transaction.
Return to Top
5. Generating Contribution Acknowledgements
Contribution acknowledgements are generated via the communications module in much the same manner as all other communications are generated.
Using a schema that has access to your contributions data, create one or more recipient groups with a filter that describes the groups for which you wish to generate acknowledgements. For example, if you wish to produce three different letters depending on the aggregate total of contributions given by a particular person, household or organization, you would create three seperate recipient groups that filter based on the contribution ranges required.
 To create your contribution acknowledgement documents, follow these steps for the first time: To create your contribution acknowledgement documents, follow these steps for the first time:
- In the main communications center form, create new recipient groups for each group of contributors that you wish to acknowledge.
You can define your recipient groups and customize your contribution acknowledgement letters as much or as little as you desire, and based on virtually any criteria such as contribution size, frequency, source, campaign, or any other criteria.
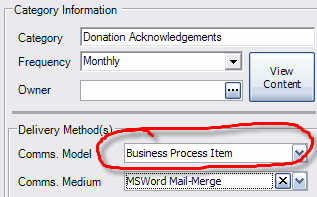
- If you do not already have a category to hold contribution acknowledgements, create one now. The Delivery Method Comms Model must be set to "Business Process Item" as shown in the graphic to the right. (Note: You may need multiple categories, one for each combination of recipient group and media type such as email and surface mail).
- In each donation acknowledgement category folder, create the number of required donation acknowledgement items that you need for all of your different acknowledgement letters and/or emails. If you were using three different contribution letters/groups, you would create three seperate acknowledgement documents with suitable text for sending to each of the three groups.
When actually running your contribution acknowledgements, the process is much the same as generating any other communications item. If generating by email, you "Run" the email from the communications control panel directly. If you are using MS Word to mail merge your acknowledgements, you would first launch Word from the appropriate tab to mail-merge your letters first, then"Run" the merge from the communications control panel in the same manner as you do for email.
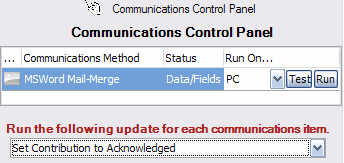 Before actually running your items, ensure that the "Set Contribution To Acknowledged" option has been selected in the communications control panel as indicated in the image to the right. (Note: If this option does not appear, you have not set The Delivery Method Comms Model to "Business Process Item" as instructed in the image above). Before actually running your items, ensure that the "Set Contribution To Acknowledged" option has been selected in the communications control panel as indicated in the image to the right. (Note: If this option does not appear, you have not set The Delivery Method Comms Model to "Business Process Item" as instructed in the image above).
This will ensure that each acknowledged contribution is set as acknowledged in the database.
Return to Top
|
