Importing Data into Gnosis
Table of Contents
- Overview
- Setting up the External
Data Source and Mapping to Gnosis Fields.
- Auto-Importing External
Data
- Manually Processing
Excluded Data
- Linking to Foreign Data
Sources
1. Overview
Gnosis Pro includes two sophisticated data import and mapping
capabilities that allow you to import data into your Gnosis Database
from any external data source, and to map Gnosis Contact information
to externally managed foreign data sources.
The import process includes a real-time de-duplification check
and includes the capability to augment information already in your
database with additional data captured externally - such as adding
an existing person to a new or existing organization as a contact,
or, adding an email address to an existing person record.
With the Foreign Data Source linking option, Gnosis retrieves
information managed in external databases or other data sources,
linking and integrating that external information with Gnosis' own
contact records. Once a Gnosis record has been linked with the
external data source, Gnosis then keeps both data sources synced and
linked.
Data may be setup to be imported into Gnosis by your Gnosis
Administrator. Linking to Foreign Data Sources must be setup
by a Gnosis support professional and is outside the scope of this
document.
Return to Top
2. Setting up the External Data
Source and Mapping to Gnosis Fields.
 External
data sources must be defined in Gnosis before they are available to
be imported by Gnosis users. This definition includes the mapping of
each field in the external data source to an equivalent Gnosis
Database Field. External
data sources must be defined in Gnosis before they are available to
be imported by Gnosis users. This definition includes the mapping of
each field in the external data source to an equivalent Gnosis
Database Field.
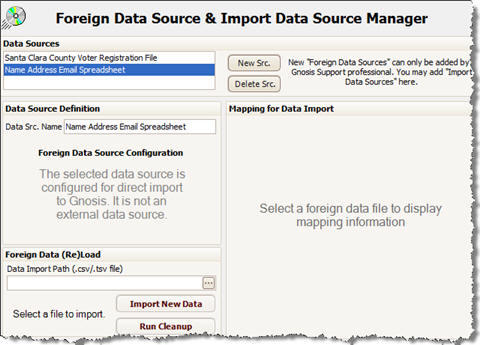
To setup the definition for the external data source, login to
Gnosis Pro as an administrator and choose Settings |
Administration | Foreign Data Sources on the main menu. The
Foreign Data Source & Import Data Source Manager form will be
displayed as shown here.
To modify an existing data source, select it in the Data Sources
list box. To add a new data source, press the "New Src."
button and give the new data source a name.
Data from external data sources must be exported to Comma
Separated Variable (.csv) or Tab Separated Variable (.tsv) files in
order for them to be imported by Gnosis. As virtually all data
management tools use one or both of these standards for data
exchange, it should be a simple matter to export data to one of
these formats.
To define a data source, you must specify a file that has been
saved with the standard field format that you wish to setup as the
external data source definition. Enter the path to a file
exported from your external data source in the "Data Import Path"
box (click on the ellipses button to use a file select dialog to
find the file). Once you have entered a valid file path, Gnosis Pro
will open the file, read the content and load the Mapping Grid with
all of the external fields present in the file.
To complete the process of defining the external data source, you
must:
- Check on the "import" check box for each field that you wish
to import from the external file.
- Select a "data table" to which the foreign data element
maps.
- Select a data field to which the foreign data element maps.
Once you have completed defining the data mapping, save your
changes and close the form.
Return to Top
3. Auto-Importing External Data
 To
import external data, the external data file must have been
previously defined by an administrator as described in the previous
section of this document, and, the import file must be available
either as a Comma Separated Variable (.csv) or Tab Separated
Variable (.tsv) file. To
import external data, the external data file must have been
previously defined by an administrator as described in the previous
section of this document, and, the import file must be available
either as a Comma Separated Variable (.csv) or Tab Separated
Variable (.tsv) file.
If
you have your data to be imported as a spreadsheet file, first, open
the spreadsheet and save the file as a "csv" file, then, use the csv
file for importing to Gnosis.
To run the data import process, choose the "Process Navigator"
from the main navigators menu area (shown in the graphic above
right) and then choose the Upload Data
icon on the process navigator page.
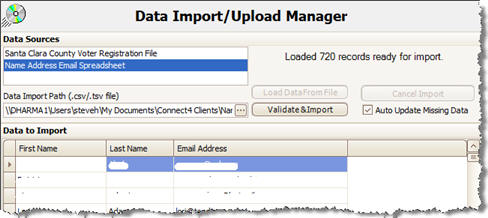 On
the Data Import/Upload Manager page, you are provided the
opportunity to select an external data source format to import, and,
to choose the file to be imported. On
the Data Import/Upload Manager page, you are provided the
opportunity to select an external data source format to import, and,
to choose the file to be imported.
Once you have specified the file to be imported, press the "Load
Data From File" button to load the external data into the Import
Grid.
Only fields defined in the data source definition will be shown
on the grid. Take a look at the data in the grid at this time
to verify that this is the data that you wish to import to Gnosis.
There are two modalities for automatically importing data.
- Import only records that do not already
exist in Gnosis.
- Import records that do not exist in Gnosis, AND, update any
missing data in existing Gnosis records.
In the first modality, the import process will automatically
import records where it cannot find a reasonable match in the Gnosis
database. Any records that are potential duplicates are
excluded from the import and marked in "red" to highlight their
excluded status.
In the second modality, non-existing records will be handled in
the same manner as for the first modality, however, where a Gnosis
record appears to be a duplicate of the import item, Gnosis will
augment the existing record with any data contained in the import
file as long as that field does not already have a value in Gnosis.
To invoke the second modality, check on the "Auto Update Missing
Data" checkbox.
To run the auto-import process press the Validate & Import
button. As Gnosis performs real-time de-duplification checking
on the importing data, the import process can take quite some time
to complete - up to 2-3 seconds per import record. While the
import is running, you may continue to use the application on other
forms.
Once the automated process completes, you will generally have to
process some excluded items manually.
Return to Top
4. Manually Processing Excluded
Data
Once the automated process completes, there will likely be a
number of items (marked by a red background) that need to be
manually processed. To filter the grid to only show items that
need manual processing, check on the "Display Only Entries Requiring
Manual Action" checkbox that appears once grid items have been
processed.
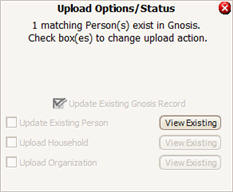 To
manually process entries, right-click anywhere on the row that you
wish to process to display the Upload Options/Status panel for that
row. This panel provides information on the actions taken thus
far on that row (if any) and what Gnosis found in the database
regarding duplicate entries if any. To
manually process entries, right-click anywhere on the row that you
wish to process to display the Upload Options/Status panel for that
row. This panel provides information on the actions taken thus
far on that row (if any) and what Gnosis found in the database
regarding duplicate entries if any.
From the Upload Options/Status panel, you may view the existing
matched Person, Household or Organization in Gnosis and provide
additional instructions to determine what Gnosis should do with the
record being examined.
Once selecting one or more actions (if required), a
"process" button appears at the foot of the panel which will perform
the selected action(s) immediately.
Once a record has been processed, it is marked green (or it will
disappear from the grid if filtering is on) to signify that import
is complete for that record.
Return to Top
5. Linking to Foreign Data Sources
If you are linking to a foreign data source which is provided via
one a flat file rather than via an on-line database (such as a
county voter registration file, or, a purchased mail list file), you
will want to periodically want to upload a refreshed file to your
Gnosis Database.
You may upload a Foreign Data Source refresh file by selecting
the foreign data source, pressing the upload button, then, once
upload is complete, running the cleanup operation (if configured) to
fully integrate the newly uploaded foreign data to your Gnosis
system.
For specific instructions, refer to the process provided for the
specific foreign data source file for which you wish to upload a
data refresh update.
Return to Top
|
